|
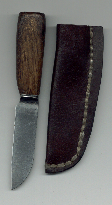
| Romani Churi & sheath |
The Romani Churi, the making of which shall be described here in
this little article, is the traditional churi (knife) of the Romanichals (Romane Chave). Amongst the Romani from British Isles
it is often referred to as "peg knife". The reason for this name is rather obvious as it was the knife that men and boys used
then "chinning the koshters", making wooden clothespins. But the Romani Churi was and is, basically, a utility knife and would
be used for just about every cutting task imaginable.
Traditionally the Romani Churi is a recycled knife; made from an old knife, and
those were, and still are, old table knives of the "bone" handle variety. If they are not found in scrap metal trash then
they are bought for a few cents on flea markets and other such possible locations.
The most common blade style for of the traditional Romani Churi, a.k.a. "peg knife", has always been the sheepsfoot
blade. This makes the Romani Churi is sort of like an xacto-knife on steroids and all cutting chores are done with this churi,
from cutting pegs (therefore the name 'peg knife'), over cutting an apple to skinning a shoshoi (rabbit) or a rukmengro (squirrel),
peeling potatoes or defending the group or oneself against attackers. There are times when the shape of the blade may differ
but this generally only happens if the original shape of the blade from which the Churi is being fashioned dictates and requires
it.
I made my first Churi from an old knife when
I was an about six-year-old chavo and without much on tools though with elbow grease, patience and some acquired skill nice
work can be produced. The Romani Churi, amongst mi fohki at least, would always be made with a sheath to be hung around the
neck or, also, with a sheath for carrying in the pocket simply. However, neck wear of the Churi was and is most common. I
always wear one small Romani Churi day and night. It only ever is taken off when I have a shower or go for a swim.
Making a traditional Romani Churi
The "raw" material for the Romani Churi is an old
kitchen or table knife. Generally it would be an old-style table knife with the bone or wood handle and with a spike tang.
The steel of those is either high-grade carbon steel or Firths Stainless steel. Firths Stainless was the first ever stainless
steel and the finest stainless steel. So the first step, unless you have got one of those old ones lying around somewhere
you have to go and get one. Carbon steel, unless you know this, looks gray to black and that is called "tarnish" or there
may even be rust there. That is not too much of a problem either as long as rust has not destroyed the spike tang. This can
also happen on the stainless steel blades, I have found. Firths Stainless steel blades have - generally - the word "Firths
Stainless" stamped on them. The handles of those knives are bone, if they are rather old or they look like bone but are made
of a plastic called Bakelite or phenol. Sometime you may even find knives like that with deer antler handles. You should be
able to find an old table knife like that on flea markets and in thrift stores, or at yard sales and such. In the States some
of those knives may not be marked as "Firths Stainless" if they were USA made. If from Sheffield, England, they will probably
be marked.

|
| Firths Stainless Table Knife before becoming a Romani Churi |
Once you have got the knife (as cheaply as possible) you first of all need look
at the lines of the blade. The shape determines rather the shape of the final blade. If it is a standard table knife (see
picture) you then have to decide where you make the initial cut to shape the blade into a sheepsfoot, the, as said, traditional
shape for the Romani Churi. That you do with a Dremmel and a metal cutting disc. If you do not have access to power tools
such as a Dremmel then you will have to do that with a hacksaw or cold chisel. This is rather hard work but that was the way
it used to be done. Then use either grinding discs and such of the Dremmel to achieve the shape with the curves on the top
for a proper nice sheepsfoot blade or you do it with a fine cut mill file. Then you must, if you want to put on a new handle
from a nice hardwood, remove the old "bone" handle. If you have found one with an antler handle I would suggest you dont remove
that though but leave it. To remove the "bone" handle the safest way I have found is to first scour a cut into the center
of one of the flat sides of the handle with the cutting disc of a Dremmel and the split the handle off with and old chisel.
Be careful, while cutting with the Dremmel not to cut the tang too much.
Now that you have shaped the blade into a nice sheepsfoot shape and have taken
off the old handle you can start on dealing with the new wooden handle. This must be a piece of hardwood from which you make
that handle, best a piece of seasoned branch, such as elm, birch, beech, yew, ash, hawthorn, blackthorn, cherry, apple, or
other. Do not try using oak, it does not work. Yew wood makes nice handle but the easiest wood to make handles with that I
have found is beech. I use a nice sized piece of branch that has been seasoned for about six months to a year, but you cut
make the handle also from a hardwood broomstick even, or some other old tool handle. Cut a piece of a length that will be
right and then with a drill bit that is just a little smaller in diameter than is the tang you drill straight down into the
center of that piece of wood you have chosen for a handle. Now take an old - and I do stress old - saucepan fill it with water,
throw in the piece of wood for the handle and boil this for about 15 minutes. Meanwhile you take your blade and, point-down,
clamp it, between protective pieces of wood, into a metal vice. Also get a hammer ready. Once the handle has boiled enough
you take it out of the water with tongs and, holding it with a cloth, carefully put it onto the spike by means of the hole.
You then hammer the handle home and do this a straight as possible. Within literally a minute or so the wood will have cooled
and shrunk back and the tag is held firm. The only tasks to do then is to shape the handle the way you want it to be and then,
finally to put a fine edge of the blade with file first and then sharpening stones. Do not use the Dremmel to do the sharpening
work as it might heat up the steel of the blade and draw out the temper and also do not use any high-speed grinding machines
for this either. Once you have put a razor-sharp edge onto the blade your very own traditional Romani churi is finished and
all that is left to do then is to make a nice, tight-fitting sheath for it from some old leather belt, bag, or whatever else.
|
